Before I started working with Jenkins, I had heard about it — and I knew that people used it to do something useful. However, I didn't really understand what Jenkins does or how it works.
Also, there is quite a bit of Jenkins documentation around but I've found that a lot of is out-of-date and didn't apply to me and my needs for embedded software development.
In this article I'll explain a bit about what Jenkins does, how it works and why you might want to think about using it — particularly for your embedded software projects.
What is Jenkins?
Jenkins calls itself an "automation server"... but most people use it as a build server. It's a server with a web interface that you can install pretty much anywhere: your laptop, a physical server in your office, or a cloud-based server like AWS. It will run on Windows, Linux, or Mac machines. It's built in Java, but you don't need to know anything about Java to use it.
Essentially Jenkins takes code from a source code repository as input and compiles it to produce your build artifacts — i.e. the binary images you load on to your board. In the process it can also run tests on your code and save the results. All of these outputs — any build artifacts or test results — are then available through the Jenkins web interface.

Note: This diagram above shows how Jenkins handles a single project, but a single Jenkins server can most certainly handle multiple projects.
Jenkins has been around for a while, is widely used, and has an active development community. There are many plugins available for supporting a wide variety of tools, frameworks and integrations. You can do a lot of custom stuff with Jenkins, and if you're having a problem chances are that someone else has had that problem before. All this means that Jenkins is really good platform to consider using.
Why would you want a build server?
How do you do your builds now? Is there one developer with a "golden machine" that produces the production builds? What if that person gets sick? Or wins the lottery? How to you build then? What about the other developers? How do they get their code tested and released?
The whole point of a build server is to automatically produce builds in an independent location (ahem, not your local machine) with a known, reproducible configuration — compiler and package versions, compiler flags, settings, etc.
These builds can then be pulled directly by your testers (from the web interface) for testing and deployment to the field.
This takes the development team out of the test and production build process. Developers commit code to source control, but the automated build process takes it from there.
In addition to simply building the application, you can also run your unit tests (built with Ceedling or whatever), configure static analysis, or whatever else you can think of (things like running tests on actual hardware, or even automatically deploying to hardware for your test team).
And, all of this happens automatically for every push (or commit) by every developer on every branch of code. This means that you'll find errors before merging new code from other developers, and they'll even know on their own before they push breaking changes.
Jenkins has plugins to support integrations with Subversion, raw Git repositories, Github or Bitbucket that will automatically detect and build new branches and trigger new builds on each push. Through plugins it even supports more obscure source control systems like Mercurial, Perforce or TFS (I'll try not to judge).
Using Jenkins with your application
The simplest way to install Jenkins is with the instructions from the Jenkins documentation without Docker, with either the WAR file on Windows or using a package manager on Linux or MacOS.
There are few different ways to configure Jenkins, but simplest is as a single server with the builds and web server on the same machine. This is fine for getting started — later it can be reconfigured to scale with increased workload.
You add projects to Jenkins by pointing it at your project's source control repository. If your project is in a private repository, you can even securely configure access credentials to pull the source.
You'll also hear a lot about pipelines. At first, I found this term to be a bit confusing. But a pipeline is just the sequence of actions that are performed on your code for each "build." This can be the build itself, as well as running unit tests, etc.
The way you define a pipeline is with a Jenkinsfile that you put right in your source code repository. When Jenkins loads your code it reads this file and executes the instructions defined in it. The Jenkinsfile has its own syntax that is pretty straight forward, and typically the steps consist of executing shell commands. For buiding your application you might run make. If you want to run Ceedling unit tests, you'd run ceedling.
Now in order run make or ceedling, your server is going to need to have these tools installed (you'll probably need a compiler too). You can install these tools right on the build server.
There are also ways to use Docker to define these build environments used by the Jenkins pipeline, in similar way to how I've previously recommended doing this on your local machine.
The web interface
By default, the Jenkins interface looks pretty lame — like a website right out of 2002. But you can make it look a lot more modern with the Simple Theme plugin. This allows you to apply one of a few different themes and add your own logo. An example from my own server is shown below. It even works decently from a mobile browser.

My test server
I've set up an example server at jenkins.electronvector.com. It's configured for anonymous read access, so you can can poke around and take a look. Of particular interest is the Tiva Blinky project. This is a real project for the Tiva C Launchpad board which I've used in the past for other examples. The updated version of this source code — used by this Jenkins server — is available on Github.
The pipeline for this build runs the Ceedling unit tests, Cppcheck for static analysis and then builds and captures the target binaries. This Stage View shows all the stages of the pipeline that are executed with each build.
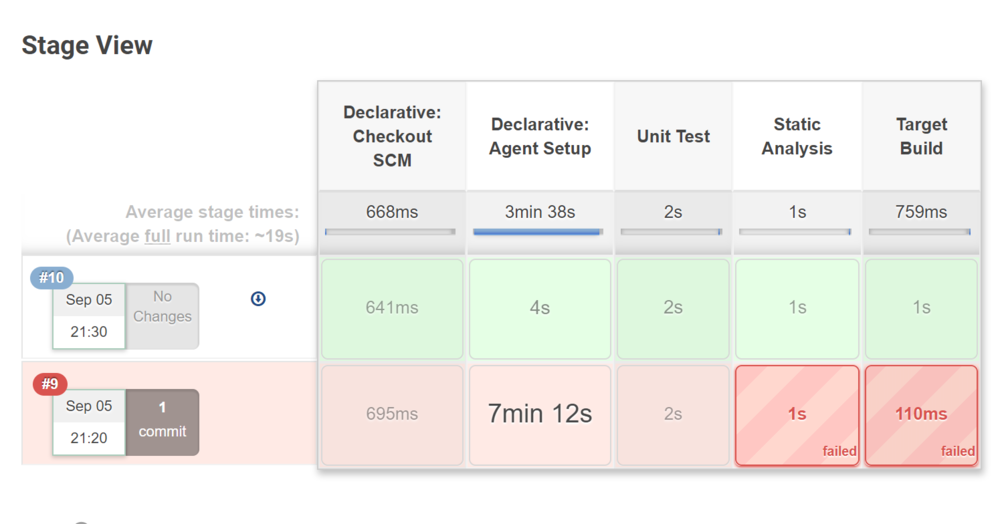
Note that build #9 is a failing build. It failed at the Static Analysis step, because I hadn't yet installed the Cppcheck plugin for Jenkins.
For each code branch you can also see the trend of test results for the last several builds and download the latest target binaries.

It's pretty nice. Can you just image your test team pulling these binaries and starting to test? Without having to wait for a developer to make them a new build?
Since all the history is recorded here, it's also easy to go back in time to test for regressions. Plus, you have that comfortable feeling knowing that each build was done in controlled, reproducible way — with the right tool versions and settings.