Note: You can find the example code for this article in GitHub in the ElectronVector/f303-staged-delivery repository.
In the previous article on GitHub Actions we looked at how to use self hosted runners to deploy firmware to real hardware.
In this article, we're going to extend this concept further -- flashing firmware onto two different STM32 Discovery boards:
- The
mainboard will get deployments whenever we merge to main. - The
releaseboard will get deployments when we create a new release.
This will allow us to continue to use our main branch as our integration branch. Anything pushed to main will get flashed to the main board for testing.
Now though, we're going to use GitHub make releases off of this main branch. When we do, we'll have the firmware flashed to the release board.
This will allow us to have one board always flashed with the latest code for integration testing -- and another board which has the latest released code.
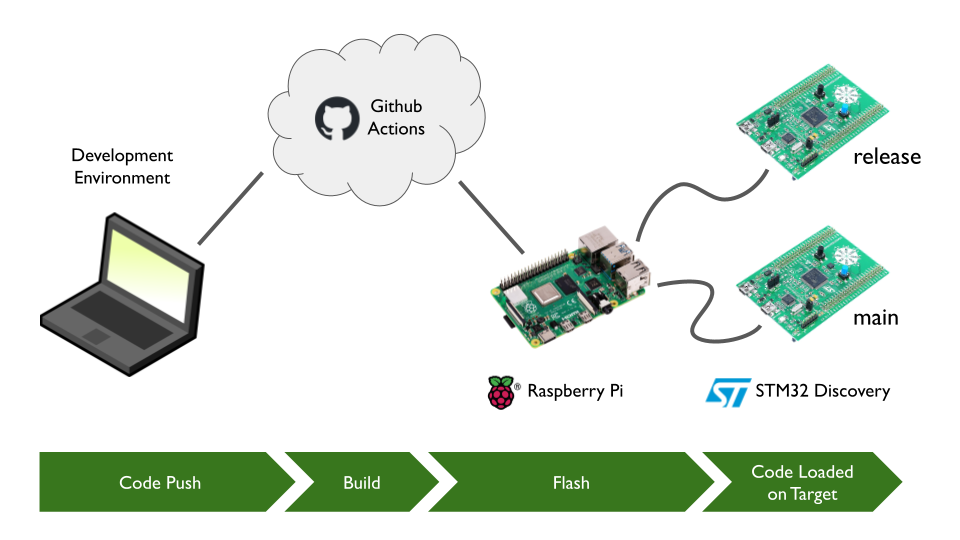
In this configuration, both STM32 Discovery boards are connected to the same Raspberry Pi which will again act as a GitHub self hosted runner for flashing the code.
Configure the Raspberry Pi to handle both STM32 boards
In order to use two different boards with the Raspberry Pi, we're going to need to install two instances of the GitHub Actions self hosted runner application. Each instance will have exclusive access to only one of the boards.
I'm working in a new repository for this article, so we will need to add two new self-hosted runners to GitHub. To start with the first runner go to Settings -> Actions -> Runners and click the New self-hosted runner button.

How to create a new self-hosted runner.
This will give you the instructions for downloading and installing the action runner on the Raspberry Pi. However, we're not going to install the runner in the recommended location. Instead, we're going to install this runner in a folder named actions-runner-main.

Instructions for installing the self-hosted runner on the Raspberry Pi. Don’t use the recommended installation locations, as we need two different instances on the Raspberry Pi.
Instead, we can download the actions runner application to the home folder:
$ curl -o actions-runner-linux-arm64-2.308.0.tar.gz -L https://github.com/actions/runner/releases/download/v2.308.0/actions-runner-linux-arm64-2.308.0.tar.gzThen create new folders for both runners:
$ mkdir actions-runner-main
$ mkdir actions-runner-release
And extract the runner application to both locations:
$ tar xzf ./actions-runner-linux-arm64-*.tar.gz -C actions-runner-main
$ tar xzf ./actions-runner-linux-arm64-*.tar.gz -C actions-runner-release
Then we can configure the main runner with command (including the token) from the GitHub instructions.
$ cd actions-runner-main
$ ./config.sh --url https://github.com/ElectronVector/f303-staged-delivery --token <insert your token here>
When it comes time to configure your runner, add it to the default run group, name it main or prod, depending on which one you are installing, and label it main. You can get fancier with these names later, but this is all you need for now.
Also use the default work folder.
~/actions-runner-main $ ./config.sh --url https://github.com/ElectronVector/f303-staged-delivery --token <your token here>

# Authentication

√ Connected to GitHub

# Runner Registration

Enter the name of the runner group to add this runner to: [press Enter for Default]

Enter the name of runner: [press Enter for r2d2] main

This runner will have the following labels: 'self-hosted', 'Linux', 'ARM64'
Enter any additional labels (ex. label-1,label-2): [press Enter to skip] main

√ Runner successfully added
√ Runner connection is good

# Runner settings

Enter name of work folder: [press Enter for _work]

√ Settings Saved.
After configuring main you can also configure the release runner from the actions-runner-release folder. You don't need to re-download, but you will need to create a hew runner on GitHub to get a new token.
Once both self-hosted runners are configured, they should look like this in GitHub:

Main and release self-hosted runners in GitHub. These represent our two different STM32 boards.
The last step in configuring our runners on Raspberry Pi is to tell each runner which ST32 board it should use. For this, we'll use the serial number of the ST-Link embedded on each board.
To get the ST-Link serial number, we can run dmesg on the Raspberry Pi and then disconnect/connect each STM32 USB cable. When we connect each STM32 board, there will be messages showing the serial number of each board. In our case, these are the serial numbers:
main    : 066CFF545150898367185232
release : 066EFF545150898367150943
For flashing we're going to use a new Python script with GDB that reads the ST-Link serial number from a file so it will flash the correct board. The GDB script expects the serial number be to in a file called st-link-serial.txt in the root folder of each runner:
~ $ echo 066CFF545150898367185232 > actions-runner-main/st-link-serial.txt
~ $ echo 066EFF545150898367150943 > actions-runner-release/st-link-serial.txt
Here is the gdb-st-link-flash-and-exit.py script that uses this file:
# Load the serial number of the ST-Link to use from a file, if it exists.
serial_command = ''
try:
    with open('../../st-link-serial.txt') as f:
        st_link_serial = f.read().strip()
        serial_command = '-c "adapter serial ' + st_link_serial + '"'
        print('Using ST-Link: ' + st_link_serial)
except:
    serial_command = ''
    print('No ST-Link serial number configured')

# Start openocd and connect to it directly via pipe.
# Use the selected serial number, if one exists.
try:
    gdb.execute('target extended-remote | openocd ' + serial_command +
    ' -f interface/stlink-dap.cfg -f target/stm32f3x.cfg'
    ' -c "gdb_port pipe; log_output openocd.log"')
    gdb.execute('load')
    gdb.execute('monitor reset')
    gdb.execute('detach')
except Exception as e:
    print('** Error connecting to target **')
    print(e)
finally:
    gdb.execute('quit')
It uses the adapter serial command to OpenOCD to select the correct ST-Link.
Define the main branch workflow
The main branch workflow is going to build and flash the code on the main board whenever new code is pushed. The workflow is defined in the build-and-flash-main.yml workflow:
name: Build and flash target binary
run-name: ${{ github.event.head_commit.message }}
on:
  push:
    branches:
      - main
jobs:
  build:
    uses: ./.github/workflows/build.yml
  flash:
    needs: build
    uses: ./.github/workflows/flash.yml
    with:
      target: main
Here we use the branches filter so that only pushes to the main branch cause this workflow to run.
If you recall the workflow from the previous article, this workflow may look a bit more terse than before. That is because we have refactored the build and flash workflows into their own workflow files. This allows us to reuse them in multiple workflows -- which we will do for the release board.
The new workflows have to go into the same .github/workflows folder. The build workflow (found in build.yml) is similar to the previous one we used to setup the environment and perform the compilation:
name: Build target binary
on: workflow_call
jobs:
  build-target-binary:
    runs-on: ubuntu-latest
    steps:
      # Cache/restore the entire toolchain so we don't need to download it on every run.
      - name: Cache toolchain
        id: cache-gcc
        uses: actions/cache@v3
        env:
          cache-name: cache-toolchain
        with:
          path: /home/runner/arm-gnu-toolchain-12.2.rel1-x86_64-arm-none-eabi
          key: build-${{ env.cache-name }}
      # If the toolchain isn't cached, we'll need to install it.
      - if: ${{ steps.cache-gcc.outputs.cache-hit != 'true' }}
        name: Install toolchain
        run: |
          curl -O https://armkeil.blob.core.windows.net/developer/Files/downloads/gnu/12.2.rel1/binrel/arm-gnu-toolchain-12.2.rel1-x86_64-arm-none-eabi.tar.xz \
          && tar -xf arm-gnu-toolchain-12.2.rel1-x86_64-arm-none-eabi.tar.xz -C /home/runner
      - name: Set toolchain path
        run: echo "/home/runner/arm-gnu-toolchain-12.2.rel1-x86_64-arm-none-eabi/bin" >> $GITHUB_PATH
      - name: Check out code
        uses: actions/checkout@v3
      - name: Build application
        run: |
          cmake . -B build/Release --toolchain cmake/arm-none-eabi.cmake -DCMAKE_BUILD_TYPE=Release \
          && cmake --build build/Release
      - name: Save target binary
        uses: actions/upload-artifact@v3
        with:
          name: f303
          path: build/Release/f303
There are two notable differences here from our previous version. First, we use the on: workflow_call trigger which allows us to call this from another workflow file.
The other difference is that we use the actions/cache@v3 action to cache the build toolchain between workflow runs. This means we don't have to download and extract the toolchain for every workflow run. Instead whatever we tell GitHub to cache (the entire extracted toolchain folder in this case) will be saved and restored in any subsequent workflow run. This ends up reducing the build time workflow from 30s to around 10s. For more information refer to the GitHub documentation on caching dependencies to speed up workflows.
The flash workflow takes an input argument which we use to tell the workflow which device to flash (as identified by the label we gave the self-hosted runner).
To tell it to flash the main board, set the target input to main with this configuration:
with:
    target: main
In the flash.yml workflow, this is accessed with ${{ inputs.target }}:
name: Flash target
on:
  workflow_call:
    inputs:
      target:
        required: true
        type: string
jobs:
  flash-target:
    runs-on: [ self-hosted, "${{ inputs.target }}" ]
    steps:
      - name: Check out code
        uses: actions/checkout@v3
      - name: Download target binary
        uses: actions/download-artifact@v3
        with:
          name: f303
      - name: Flash target
        run: gdb-multiarch -x gdb-st-link-flash-and-exit.py f303
The runs-on configuration is how you tell GitHub which self-hosted runner to use. The following configuration:
runs-on: [self-hosted, main]will instruct GitHub to use the self-hosted runner (the ones on our Raspberry Pi) that has been labeled main.
Drafting releases -- an intermediate workflow
Our ultimate goal with the release board is that we want it flashed whenever we do a release from GitHub. Creating a release can be automated with GitHub actions, but I like the release process to have a manual trigger so that a human can:
- Decide when to make a release.
- Update the release notes.
There are steps that we can automate however, to reduce the number of manual operations and to make the release process less error prone. One way to do this is to automate the creation of a "draft" release.
A draft release is just a release that hasn't yet been published. By starting with a draft release, we'll be able to automate a few things and still review and update the release notes before publishing.
The draft release workflow is manually triggered and is responsible for:
- Creating a tag for the release.
- Creating the draft release.
- Setting a release version number.
- Adding the target binary.
To create a manually triggered workflow, we use the on: workflow_dispatch trigger. When this trigger is configured for a workflow it gets a Run workflow button used to start it. Note that the workflow_dispatch action must be on the default branch (main in our case).

The Run workflow button is used to manually trigger an action.
This workflow is defined in draft-release.yaml:
name: Draft release from main
run-name: Draft release ${{ inputs.version }}
permissions:
  contents: write
on:
  workflow_dispatch:
    inputs:
      version:
        description: 'New release version number'
        required: true
        type: string
jobs:
  build:
    uses: ./.github/workflows/build.yml
  create-release:
    runs-on: ubuntu-latest
    needs: build
    steps:
      - name: Create tag
        uses: actions/github-script@v6
        with:
          script: |
            github.rest.git.createRef({
              owner: context.repo.owner,
              repo: context.repo.repo,
              ref: 'refs/tags/${{ inputs.version }}',
              sha: context.sha
            })
      - name: Download target binary
        uses: actions/download-artifact@v3
        with:
          name: f303
      - name: Create release
        uses: softprops/action-gh-release@v1
        with:
          name: ${{ inputs.version }}
          tag_name: ${{ inputs.version }}
          draft: true
          files: f303
This workflow creates a version name as input which is used to title the release and name the tag that is created. When clicking the Run workflow button there is a field to enter the version name:

When an input is required for a manually triggered workflow, there is field provided where it can be entered.
Creating the release workflow
The last workflow that we need is the one that will flash the release board when a draft release is published. This is defined in flash-release.yml:
name: Flash published release
run-name: Flash release ${{ github.ref_name }}
on:
  release:
    types: [published]
jobs:
  flash-target:
    runs-on: [ self-hosted, release ]
    steps:
      - name: Check out code
        uses: actions/checkout@v3
      - name: Download target binary
        uses: dsaltares/fetch-gh-release-asset@master
        with:
          repo: 'ElectronVector/f303-staged-delivery'
          version: 'tags/${{ github.ref_name }}'
          file: 'f303'
          token: ${{ secrets.GITHUB_TOKEN }}
      - name: Flash target
        run: gdb-multiarch -x gdb-st-link-flash-and-exit.py f303
This action runs on only published releases, and we set it to run on the [ self-hosted, release ] runner which will target our release board for flashing.
Putting it into action
Now that we have all three actions in place, we can walk through how to use them to flash our code to our boards in a staged way.
The first step is to push a change to the main branch which will build and flash the code onto the main board.
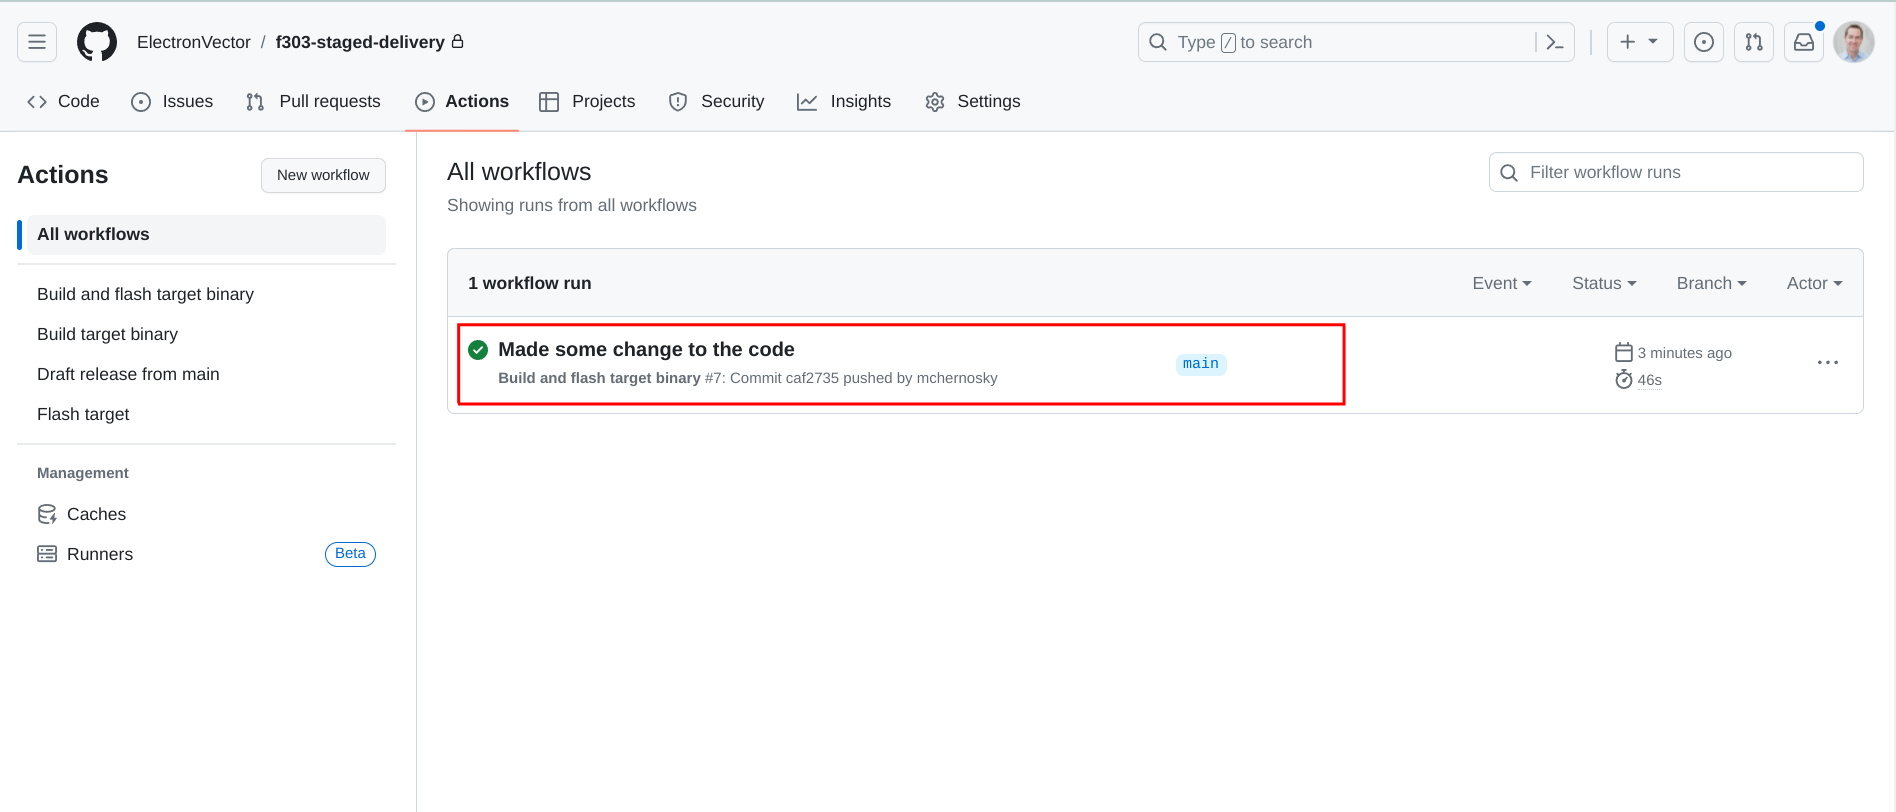
The main workflow runs on any push to the main branch — and builds the code and flashes the main board.
Now that there is some code on main, we can start the release process by "drafting a release" with the draft release workflow. On the Actions page, select the Draft release from main workflow and click the Run workflow button. Enter a name for the release and click Run workflow.
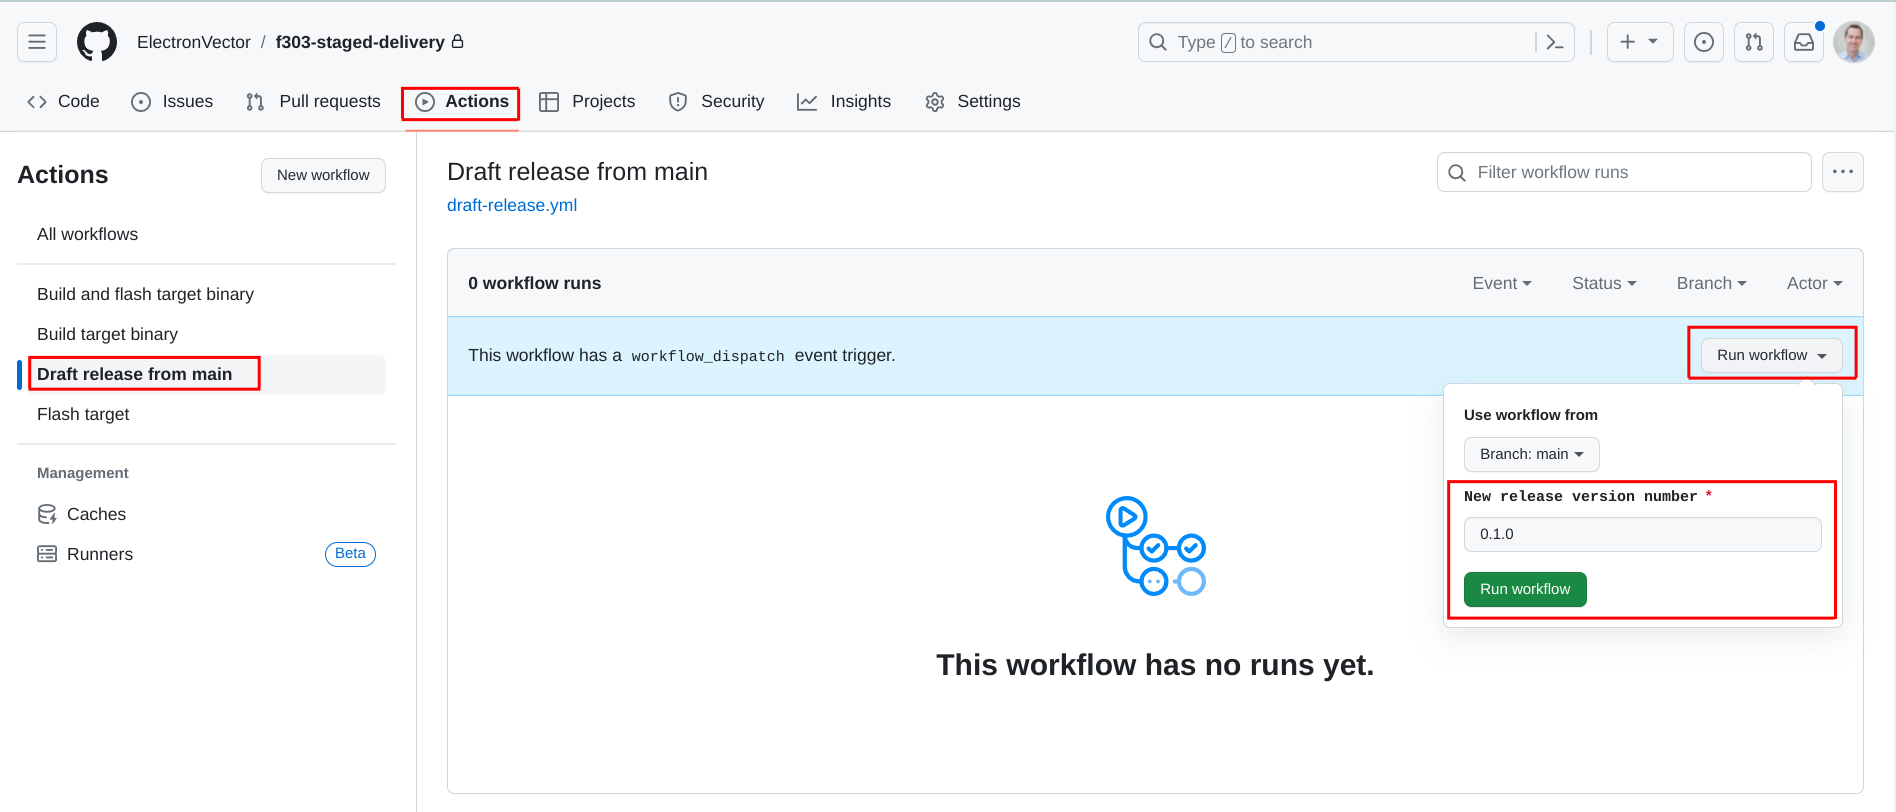
Drafting a release.
This will run the draft release workflow:

The draft release workflow has run.
After the workflow has completed, there will be a new draft release in the repository. Navigate to the releases by clicking Releases on the Code tab:

Finding the releases in a GitHub repo.
The new release is listed on the releases page. To publish the release, we can click on the edit icon:
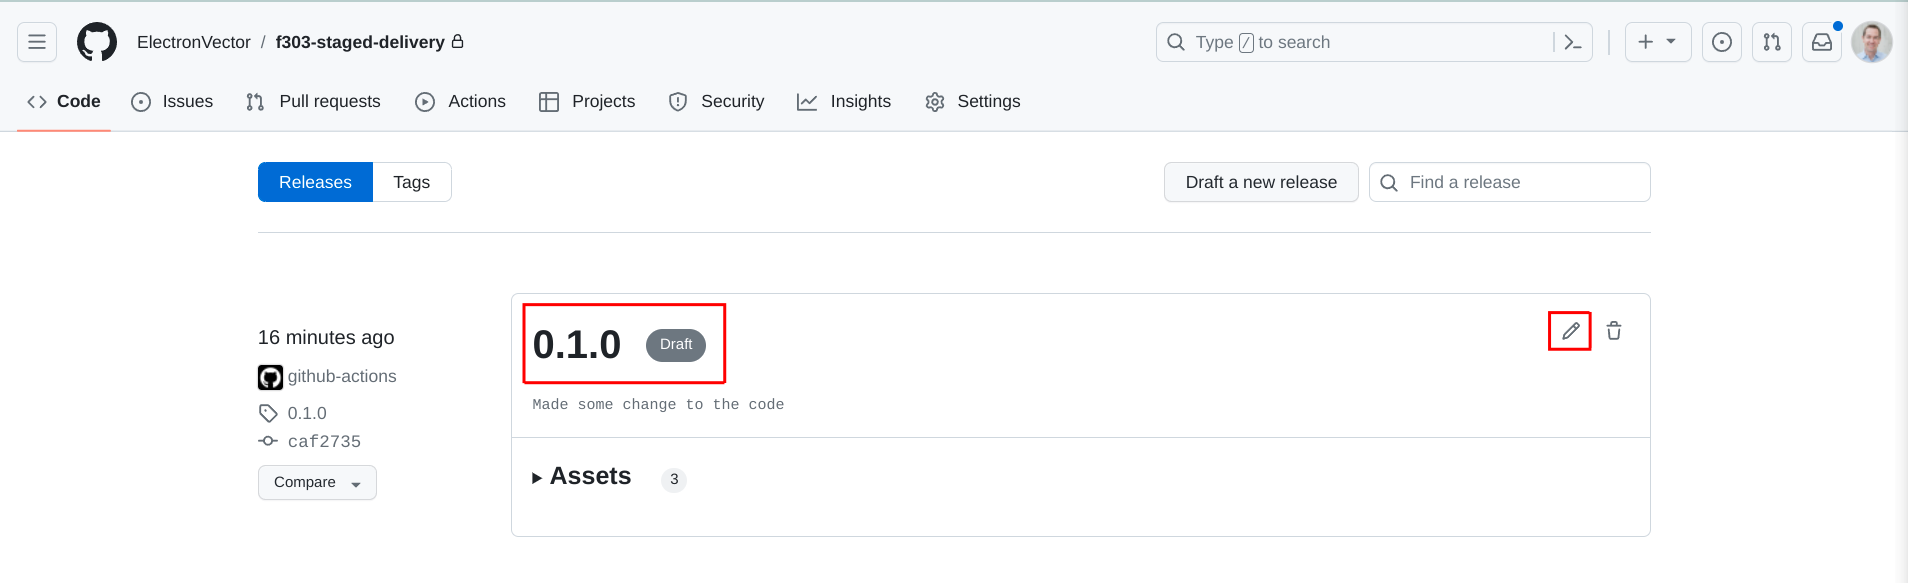
The releases page.
This brings us to the page where we can edit the release. We could add whatever release notes we want in here and when we're ready we click Publish release:

Publishing a release.
When the release is published, it triggers the workflow to flash our release board:
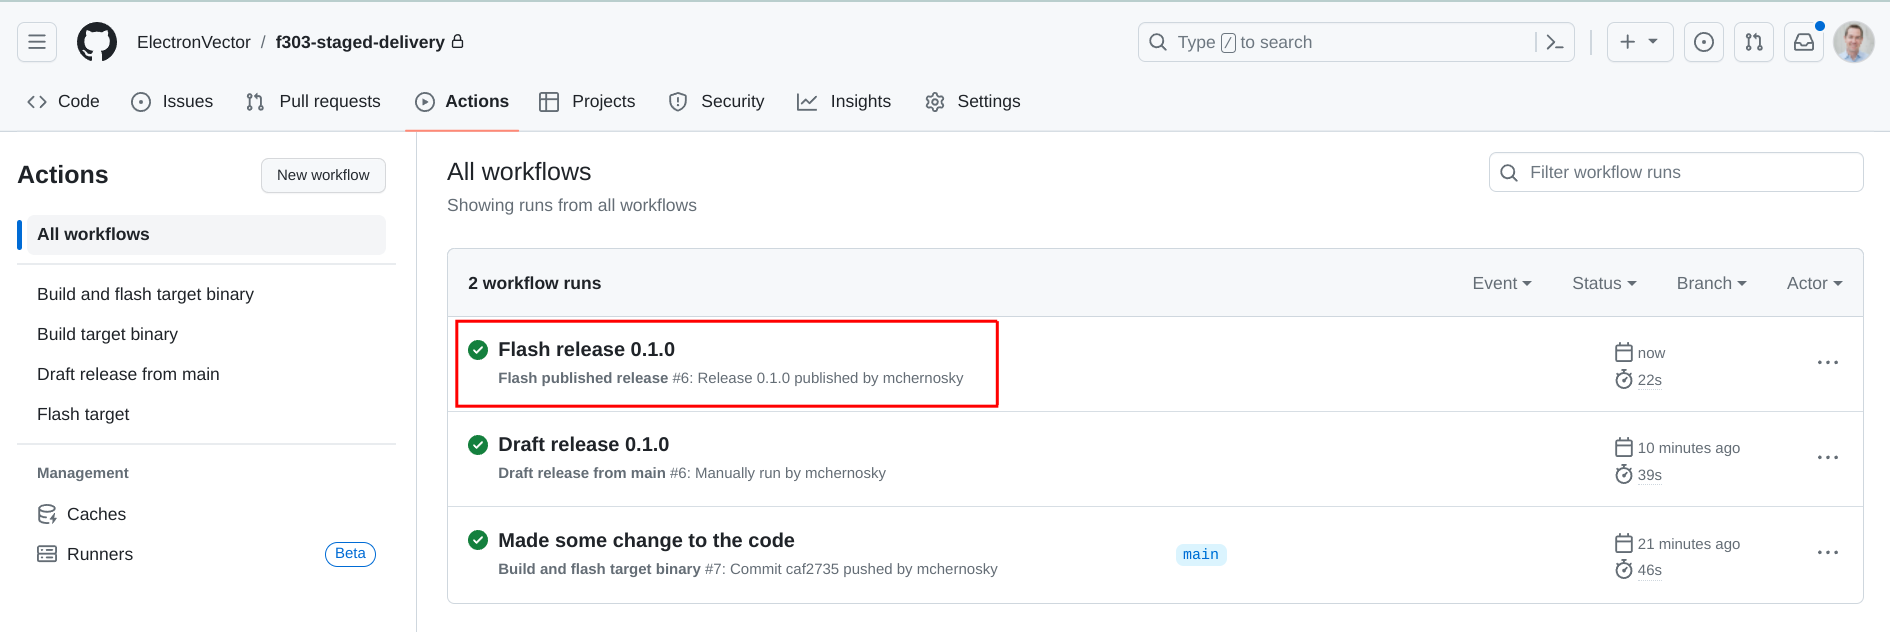
Flash the release image onto the board.
And there we have it! We have our workflows set up to automatically flash our main board whenever we integrate new code on the main branch.
When we have accumulated enough work on main and we've tested it for confidence, then we can decide to do a release. Only after completing the release of the code is the firmware on the release board updated.
Now we can continue to integrate new features on the main branch (and testing them on the main board) while the release board still has our most recent released code. This is useful for testing the and working with the two different builds at the same time.